I did some research about multiple structures and different kinds of material wall collapse. For example, I read through some articles to make comparisons between the reinforced framed structure and steel structure, they have different features when deconstructed and both have cons and pros for buildings. Also, the glue and constraints structure may show differently when there’s a force to break the wall. I searched image references of various material deconstruction, like reinforced structures, steel, rebar, brick, and wood. Furthermore, I found some video references to see how exactly the structures collapsed. I’m interested in glass fracture, wood fracture, and brick wall collapse. I will make some simulation tests about different kinds of materials.
Miro Research Link:https://miro.com/app/board/uXjVNk48Rl8=/?share_link_id=958189597678
Simulation Test
Breaking wood, glass and concrete
I used RBD material fracture to make different kinds of fractures, which can create the wood, glass, and concrete texture. The four boxes are used to constrain the wood to be fractured.
The scatter point can be modified to create a number of fracture points of glass and the see can produce different kinds of positions to break. The boxes are also used for constrain.
The billowy smoke can create a dust feeling when the concrete pig is smashed, and it needs to be improved.
Colliding the brick wall
I made this breaking brick wall simulation by using the rbd material fracture and red constraint from rule. Firstly I built the brick wall in a procedural way, and I used rbd material fracture to make the wood window frame. The rbd bullet solver made the final collision by combining those sources together, and I keyframed the sphere to make it as the collider. Finally, I created the billowy smoke to make some dust effect for the bricks when they are falling.
To make the brick wall look more realistic, I added the point vop and used some vdb nodes to add some noises for the single brick. Then I used the normal to correct the faces and copy them to make the procedural wall.
To add some motivation for the collapsing wall idea, I want to make a driving car as the collision force to the wall. I used a car model that found on Sketchfab and rigged the car in Blender. I used an axis as the main control and made the car body and four wheels parented to it. The driver information on each wheel makes them move and the X-axis can create the effect of a correct wheel rotation.
After improving the look of the brick wall, I reset the simulation to make the car to crash the wall. I will align the wall in a more standard shape and add some smoke and dust.
Wood Wall Collapse
I exported the car animation as an alembic file and imported it to Houdini. The car is a collision source and I connected it with the rbd bullet solver to make the wood collapse. I will improve the car animation because it looks kind of slow right now and want to make the motion look sharper.
I downloaded a character with a spin attack with a weapon motion and imported it into Houdini. I used a similar way to make it a collision source to compare which kind of collision source looks better and more realistic. The glue wood wall looks too strong right now as not a lot of splinters are falling, and I will improve this later.
The constraints on the wood wall was strong and I improved it by bypass the rbd configure.
Voronoi Fracture Failed Test
I made this glue hard constrain wall fracture, but it couldn’t run the simulation correctly because the Houdini.19 has some version problem with the SOP import inside the top network. I found this issue also happened to other people on the internet, but I still want to show this unfinished simulation as my process.
Final Outcome
I used the copy nodes to make the brick wall and used the boolean to add the wood frames inside the wall. It has some problems with the boolean but I fixed that, it was because the boolean was like cutting the shape of the wall, and it had to be placed nicely and avoided overlapping with the brick edges. Furthermore, I used the match size to make a fractured glass window inside the frame. The whole simulation is made of glue constraint and simulated by an RBD bullet solver. The brick had too much constraint and I decreased them by playing with the parameters. The alembic car was still imported as collision geometry and it bumped the wall nicely. Finally, I added some billowy smoke to make the dust kind of effect.
Final Outcome
I edited the final film in After Effects and used different kinds of sound effects, the sound of cars turning on their engines, and brakes, rubble falling, and the sound of bricks falling. As for the improvement, I think adding some particles could look more realistic as the dust. Also, the bricks might break as well in real life, not only the whole wall. Some pieces of bricks can also be constrained not to move.
I learned how to use the animation editor in Houdini to modify the animation in multiple ways, and several taps can change the look of the animation graph.
Smoke Machine
I used basic polygons and copy nodes to make the support bars cloth, and then I keyframed them to make the rotate animation. The furnace and the rotor shaft are all made by revolve modes, and I used the boolean node to cut out the shapes of the rotor shaft. The smoke was made of billowy smoke, which was intended to rise up the cloth. The smoke went through the cloth at the beginning, and I used vdb to create the static objects to make a collision between the furnace and the cloth.
Wineglass explosion
I made this wineglass explosion simulation by following the tutorial online. I used the curve tool to carve the wineglass into several random pieces, which allowed the exploded glass pieces to fly when the bullet hit them. I used the stage in Houdini to render the final animation.
Walking cloth animation
I made this walking cloth animation in Houdini. The mocap biped model in Houdini provides multiple basic movements, like walking, jumping, and running. etc. I made the cloth collision by using a grid and rendered the final animation.
Boat And Ocean Simulation
I made this boat simulation and collision with the ocean. The ocean is made of particles and I did the model setup at first. The process was complicated and it wasn’t great at the beginning. I kept improving it until the boat stayed on the ocean instead of dropping down. I made a preview video at the end to see the effect.
I drew the detailed storyboards to think about the plot, and it will be used for animatics too. We thought that it might be weird and difficult for the audience if the character didn’t have facial features at the beginning. Therefore, the character has facial features, and she will show emotional changes. The storyline still follows the old one, which is about her being attracted by the light and going close to the water tank.
We critically reflected on our previous concept and researched to make the narrative more understandable. For example, we researched evidence of fish schooling and fish shoaling as sources to design the liquid ball movements. Also, we were inspired by the book recommended by our tutor-“Elemental Magic”, which has multiple liquid theories and designs. The water, liquids, and bubbles all have some rules, and we followed these guidelines to use these elements more effectively in our story.
Character Development
We used the Character Creator to make our final 3D character. Actually, we tried to use Meta Human at first, but we had tons of technical issues and it was difficult to go through multiple software as well. This character has a simpler making process and it’s easy to blend shape in and add the facial expressions as well.
Experiments
Vellum Soft Body Liquid Balls
Vellum Soft Body Test
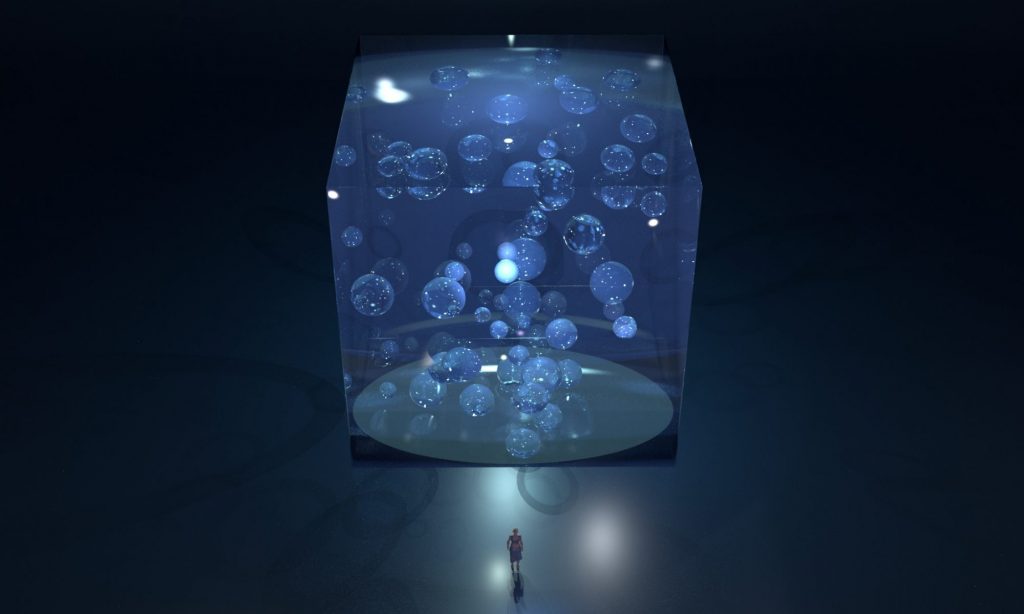
In our story, there will be some abstract forms inside the water tank that represent creatures or alive organisms. To connect with the liquid balls that will come out of the water tank and float around the character, I decided to create unique spheres to symbolize the liquid balls. I used a vellum soft body and collider to make the experiment, and those soft spheres seem like random organisms floating inside this water tank.
The inflating effect makes the spheres look softer and rounder, providing the strength to float inside the cube. Additionally, these spheres can collide with the cube, which will make those liquid balls look more natural and vivid after assigning materials later
Liquid Ball Trail Test
I used some vellum nodes and the vellum solver to make the liquid balls collision test. This section is about when liquid balls get stimulated by the touch of the character and float behind the tank, just like fish school feels shocked. However, the stretch and bend should be improved because the liquid balls look like sticking to the face of the tank. I used a pop wind node to control which direction I want the liquid balls to float.
Liquid Ball Trail Test
I used several nodes to manipulate their shape and looks to make the liquid balls look like fish schooling. I used a scatter node to copy some points from a sphere and made those liquid balls. Then I used the attribute noise vector node to create random movements of these liquid balls. The mountain node helped to create subtle waves on their surfaces, which made them look more natural as water.
Bubble Animation Test
There will be some bubbles coming out of the character and the fish in our animation, I used the pop network as a particle emitter to emit some particles and used copy to points node to create these bubbles. I decreased the amount and birth rate of particles to control how many bubbles I wanted.
Partial Ripple
I used the grid to test if I could control the ripple location individually. In our narrative, the place where the character touches will have some ripple effect, so it won’t happen on the whole surface of the tank. I used the ripple object and ripple solver to make the effect. Furthermore, I keyframed the metaball to use as a trigger. The bulge node created the magnitude power to lift the partial grid. Therefore, when I play it, there will be a ripple effect that follows the metaball trace I made. This is an initial test and I will use this to make further touching animation for the character.
I improved the ripple by using a group to select some faces and rems them, which creates a smoother ripple effect.
Improved Version
Clothing Test
The top and dress are now colliding with the character in the right way, and I will improve the sub-steps and polygons to make the clothing less elastic with colliding with the body.
I made some clothing tests in Houdini by mainly using some vellum nodes. The clothing shape came from the curve and I used the planar patch from curve to create the clothing. The vellum drape and vellum constraint helps to sew the clothing and make collisions with the character.
Some details were made through the process as well, like using the attribute wrangle, crease, and vellum post process to control the creases. Because creases are important to make the pieces of mesh look more realistic, I deleted some creases to make the clothing look more beautiful too.
Fish Animation Test
I made a procedural fish animation in Blender and used several nodes to control the rotation, speed, direction, and stretch of the fish. Then I exported it as an alembic file into Houdini and it worked. The procedural method gives a simpler way instead of keying each frame to animate the fish, and it looks very smooth. I will improve the animation to match the liquid ball movement later.
Animatics
Animatics Version 1
I made this simple animatic and edited the video based on the storyboards. I got some suggestions from my tutor about the camera angles and music. For example, the part when the character touches the tank and the liquid balls break the tank is a stunning and important thing in the story. We should improve the pace to slow the touching movement and emphasize this change in the plot. Additionally, some cut shots should be removed because they are too jumpy. We are going to find some music to improve the emotions. For instance, some sound effects can be added to symbolize different stages, like the touching movement or break-out movement. Therefore, the story can also be manipulated by the sound in some way, not just the visuals.
Animatics Version 2
Based on the feedback, we improved the animatics and going to complete our animation.
Motion Capture
After Rokoko’s first attempt didn’t work out well, we tried the Vicon system, which was more accurate, because the point of mocap is to capture more accurate movements to reduce the work of cleaning up afterward. The Rococo’s mobcap resources will distort the character’s body, and the skin weight looks odd after connecting the animation together.
I tried to transfer the FBX texture on Aleblic file and it didn’t work. For some reason, they have different point count although they are exactly identical characters. Therefore, I decided to choose only one type of character to make the later animation
We cleaned the animation in Maya exported as alembic files into Houdini, and matched it with our previous scene and simulations.
Rendering
I set the character materials in Houdini. We decided to use the FBX format for animation, and the alembic format for vellum cloth collision because the FBX character cannot simulate correctly with the cloth (might be affected by the bone deform node). The eyeball and the eyelashes textures were missing so I connected them manually. I found the cloth materials online and assigned it for the cloth, and changed some parameters like roughness, etc.
We found some references for the ambiance we wanted to create for the scene, and we liked the underwater muddy and glowing feelings. The liquid balls and tank looks more realistic if they are not that clean or transparent, because the underwater looks like water due to the misty and muddy look.
I did some render testing to see how we can make the underwater feelings. I made underwater sun rays to create light feelings under the surface of the water. Personally, I like putting the sun rays in the whole scene, because it looks more muddy and with clear line shape lights. Putting the sun rays inside the tank might make the scene looks empty, and we are still improving this.
I changed the tank material to the basic liquid in Houdini, which creates a better muddy and water effect. Additionally, I played with the lights and the shadows of the water balls made the ground look full of patterns too. I really like the crystal and blue effect of the water ball.
Because the cleaning of the character’s walking motion is not that perfect, the character sometimes steps her foot into the ground and I have to raise her up. So she looks slightly like walking in the air right now, and I will improve this later to make her look more sticks to the ground.
For example, the lighting of the ripples is very difficult. The ripples in real life reflect a lot of sunlight, but we wanted to create a dim environment, so we needed a lot of lighting and post-adjustment to make the whole film look consistent.
We added a pure ripple shot between touching the ripples and the water balls coming out. Because most of our shots have the character, we want to use this immersive shot to gradually reduce the cutting feelings of the camera.
We added the particle effect in consideration of how empty the tank would be if the water balls escaped from it. We wanted to make the box look more like water, in addition to muddy and blue materials, the planktonic effect can make it look more magical. Therefore, we wanted to use particles to resemble the planktonic. The final particle effect was created in Houdini by Sharon, who added a luminous effect to enrich the atmosphere.
To present a more focused effect on the character and the main water ball, I change the focal distance of the camera to adjust the depth of field. Therefore, the water balls look a bit blurry and just like the backgrounds to pop out the front part.
The improvement of this shot will be the changes of the bubbles, because the bubbles floating around the character cannot be seen clearly, and I will change the size to make it more obvious in later finalization.
The file formats that can be exported are limited, so we can’t perfectly use any format in Houdini, alembic format can do good collision animation but it doesn’t carry textures, and FBX carries materials but it has render issues in render farm.
Final Outcome
This is the final result, and we will try to re-render later to eliminate the glitch issues or replace our character with a new material that is appropriate for our story and scene. I want to improve the bubble animation as well because they look overlapping with the background water balls. In the editing stage, I adjusted the colour of each shot to make them more matching. I maintain the objects to be clear and change the whole tone slightly purple and cold to create a cool-toned style. What is more, the fonts also had luminous effects, which were more related to our overall atmosphere.
Indeed, “Ripple” is the idea we finally selected. We considered that it has more potential to be explored through 3D animation, 3D simulations, and techniques. This word comes from the liquid visual effect we want to make, and it’s a word that can be explained in multiple ways. For instance, a ripple could be a small change or action which causes a significant impact. We wanted to use the “ripple” to relate to environments or places in order to establish the connection with summer research. Moreover, a ripple could be explained in a psychological way, like something changed in our deep hearts. The ripple can be demonstrated through 3D simulations.
Artists Research
Unsupervised Machine-Coral | Refik Anadol
We were inspired by Refik Anadol’s AI-generated artwork “Unsupervised Machine” and “Coral”. The abstract and stunning art form gives the audience the opportunity to imagine and rethink the world and space around us. We thought “ripple” could somehow evoke people psychologically like something changed in our hearts when audiences look at our artwork. Therefore, it can convey a kind of emotional resonance.
The Last Airbender
We researched visual elements that connect with our theme “ripple”. The movie “The Last Airbender” had cool water simulations and movements that brought up our interests and showed a beautiful visual reference for us to learn. We looked into different kinds of 3D liquids and water elements to get inspiration.
We were influenced by artist Smeccea, who designed different kinds of 3D characters with glittering and smooth skin. Since the character had a connection to water, we felt this had something to do with our story. In addition, some characters do not have facial expressions. This gave us inspiration to design the plot of the narrative.
Story Board
AI-Generated Storyboards
The story is about a character and a big water tank in an empty space. In the beginning, the character does not have a specific gender or any facial expressions. She is attracted by the water tank and walks to it, touches the surface and the tank surface begins to ripple. Her body transforms into clear water material as she touches it. A few water balls split from the tank and float around her. She touches one water ball that appears in front of her, and the liquid forms into a fish inside. The fish blows a bubble to show response and interaction with the character. To communicate with the fish, she eventually opens his mouth and two eyes, and blows a bubble. “Ripple” is represented three times in the story: the first time is the tank ripples, the second time is the change of the character’s body, and the last time is the psychological change. The liquid implies life, and the human touches the water, thus in a way, she also gives life to the liquid. Therefore, the liquid morphs into a creature shape to respond to the person.
I used Stable Diffusion to transform the black-and-white drafts into colourful storyboards.
Visual Reference
Liquid Balls Movement Path
As for the liquids that split from the water tank, we want to make those liquids look alive. I was inspired by Anuar PatianeFloriuk’s photography, and he shot stunning underwater photos of a fish school. Those fish form into abstract shapes, which look like patterns that resemble life. The seeds that represent Eywa in the movie “Avatar” float in the air. Even though they don’t have faces or bodies, audiences can sense they are sentient creatures and have consciousness.
The patterns created by aliens in the film Arrival also look sequenced and full of life. They look abstract but also purposeful in a way. Therefore, I think the liquids in our story can form in a shape that looks like they have lives. The liquids imply life, which has interaction with the character.
Workflows
We wrote workflows before making the animation and asked for suggestions from our tutors:(Black are our questions, red are tutor’s feedback)
My role: Simulation, Materials setup, Lightning
Shiyu’s role: Character modeling, Character animation, Environment modeling
Common work: Object modeling, Basic animation, Motion Capture, Compositing, Music
Experiments
Liquid Ball SuctionLiquid Trail & Liquid Morph
I made liquid trail and liquid morphing tests. The liquid trail can be designed as the moving liquids inside the tank. As the liquid changes into the fish, it may be utilized for liquid morphing.
Liquid Ball Material Test
Because the water ball has movement, I was thinking about how to make the animation less heavy rather than making all the simulations on the objects. I found the noise effect in Maya and the mountain node in Houdini are very useful for creating ripple effects on the sphere surface. I made the render test to see how they look in liquid materials. In addition, I used the suction fluid node in Houdini to test how could the liquid split from a water tank. I keyframed the sphere tomake it move a little bit.
Liquid Hand Simulation & Material Test
When the character touches the water tank, we want to make her fingers or arms into liquid material to show the ”ripple” and interaction from the tank.
I made curl force and vortex force to drive the liquid to move and then added the liquid materials to the test. I improved several times to make the shape look as delicate as the original hand, nevertheless, it should be improved later.
Shiyu made this real-life footage test and combined it with the rendered liquid ball images. We acted like the character who touched the liquid ball.
Character Design
Shiyu made the character design for our animation. For now, the person has glittering skin and scales that show a connection with liquids, but we will improve it to a more detailed one to make it look more mysterious, fine, and smooth. Because the character should indicate the liquid element more, rather than fish or creature-looking.
Next Steps
Tutor’s Feedback
Klaus: The Ripple story shows how the person was isolated at the beginning, but she breaks the isolated state through a series of actions to the water tank. In order to show how she gives life to the water, the liquid fish could blow a bubble out, and this person also blows a bubble out to respond to the fish.
Sam: In the film Avatar, the seeds from Eywa show they are alive and they have consciousness. Although they don’t have faces or bodies, the audience believes they have spirits through the detailed movement in the air. The liquids could transform into creature shapes and float around the character to show their vitality.
Classmate: maybe considering what the liquid represents specifically in the story, like is it represented as life? Or it could be a kind of reflection of the person’s psychological change? Like the mirror of her heart.
Conclusion: I think the next step would be to improve the liquid simulation and inject souls into it. We’ll see how well the simulation integrates with the character since it’s essential to our animation. In addition, we are going to test the motion capture technique and shoot footage of our facial expressions and movements. Therefore, we could see the possible combination of those resources.
Before researching for the summer project, I concluded software and skills that I had already tried. In order to find out what other areas I had not previously discovered, such as the fresh skills and categories that could turn into stories, I browsed software websites to check different kinds of tutorials and introductions.
The story starts with an iceberg environment, where some fish that are made of ice materials live in the ocean. Those fish jump out of the ocean and melt into the water due to temperature changes. Furthermore, The transition of temperature could be demonstrated through the shift of cold colours to warm colours. I used Stable Diffusion software to generate some storyboards as visual references.
Summer Research Theme 2: Escape
AI-Generated Storyboards
The narrative is about a small water monster in the kitchen. I was inspired by the kettle at home and its blue light inspired me that something is happening. The kettle’s water comes to life and transforms into a tiny monster when the light is on. He ran out and started to explore the place around him.
However, the story should be told more specifically about the source of the energy and why the light is provided because the blue light implies that it gives life to the monster. This can be made with more improvements.
Summer Research Theme 3: Memory Storage
AI-Generated Storyboards
During the summer holiday, I traveled to different places and thought about the topic of memory storage. I was inspired by the photo album on my phone. The story is about a cellphone on the table, someone scrolls the photos and there are 3D objects and elements pop up from the images. For instance, if it’s a photo of a coastline, there might be some fish jumping out of the phone; if it’s a photo of an amusement park, it could be some fireworks blooming above a castle. Because everyone has a phone, this can bring together memories that are similar among people.
Nevertheless, the idea of when a cell phone could become the object to restore people’s memories should be considered. Since we’re the ones who create memories, did software or social media over time alter our unique experiences? Those questions could be considered.