Storyboards Development
I drew the detailed storyboards to think about the plot, and it will be used for animatics too. We thought that it might be weird and difficult for the audience if the character didn’t have facial features at the beginning. Therefore, the character has facial features, and she will show emotional changes. The storyline still follows the old one, which is about her being attracted by the light and going close to the water tank.
We critically reflected on our previous concept and researched to make the narrative more understandable. For example, we researched evidence of fish schooling and fish shoaling as sources to design the liquid ball movements. Also, we were inspired by the book recommended by our tutor-“Elemental Magic”, which has multiple liquid theories and designs. The water, liquids, and bubbles all have some rules, and we followed these guidelines to use these elements more effectively in our story.
Character Development
We used the Character Creator to make our final 3D character. Actually, we tried to use Meta Human at first, but we had tons of technical issues and it was difficult to go through multiple software as well. This character has a simpler making process and it’s easy to blend shape in and add the facial expressions as well.
Experiments
Vellum Soft Body Liquid Balls
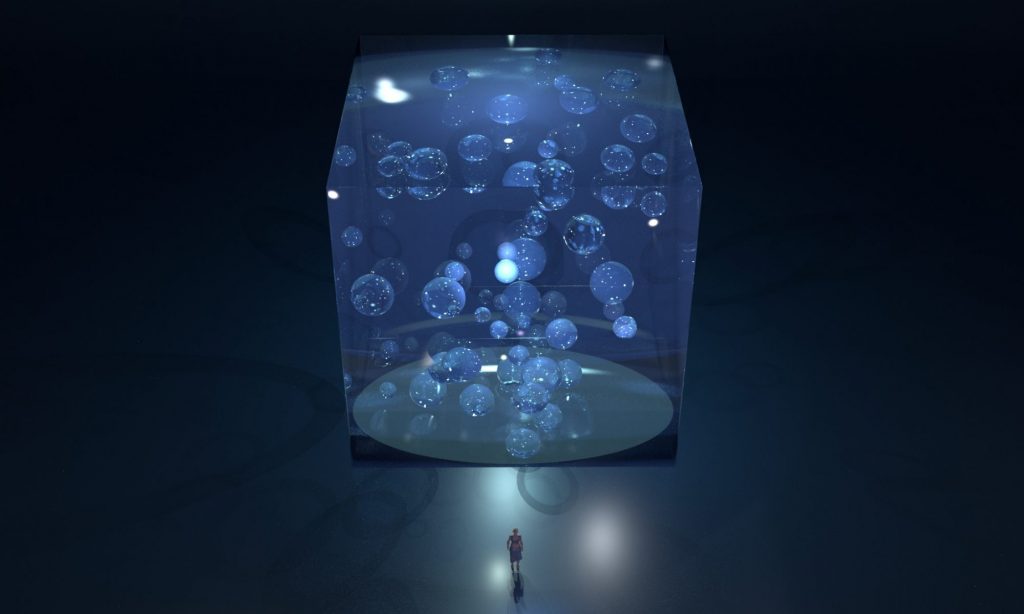
In our story, there will be some abstract forms inside the water tank that represent creatures or alive organisms. To connect with the liquid balls that will come out of the water tank and float around the character, I decided to create unique spheres to symbolize the liquid balls. I used a vellum soft body and collider to make the experiment, and those soft spheres seem like random organisms floating inside this water tank.
The inflating effect makes the spheres look softer and rounder, providing the strength to float inside the cube. Additionally, these spheres can collide with the cube, which will make those liquid balls look more natural and vivid after assigning materials later
Liquid Ball Trail Test
I used some vellum nodes and the vellum solver to make the liquid balls collision test. This section is about when liquid balls get stimulated by the touch of the character and float behind the tank, just like fish school feels shocked. However, the stretch and bend should be improved because the liquid balls look like sticking to the face of the tank. I used a pop wind node to control which direction I want the liquid balls to float.
Liquid Ball Trail Test
I used several nodes to manipulate their shape and looks to make the liquid balls look like fish schooling. I used a scatter node to copy some points from a sphere and made those liquid balls. Then I used the attribute noise vector node to create random movements of these liquid balls. The mountain node helped to create subtle waves on their surfaces, which made them look more natural as water.
Bubble Animation Test
There will be some bubbles coming out of the character and the fish in our animation, I used the pop network as a particle emitter to emit some particles and used copy to points node to create these bubbles. I decreased the amount and birth rate of particles to control how many bubbles I wanted.
Partial Ripple
I used the grid to test if I could control the ripple location individually. In our narrative, the place where the character touches will have some ripple effect, so it won’t happen on the whole surface of the tank. I used the ripple object and ripple solver to make the effect. Furthermore, I keyframed the metaball to use as a trigger. The bulge node created the magnitude power to lift the partial grid. Therefore, when I play it, there will be a ripple effect that follows the metaball trace I made. This is an initial test and I will use this to make further touching animation for the character.
I improved the ripple by using a group to select some faces and rems them, which creates a smoother ripple effect.
Clothing Test
The top and dress are now colliding with the character in the right way, and I will improve the sub-steps and polygons to make the clothing less elastic with colliding with the body.
I made some clothing tests in Houdini by mainly using some vellum nodes. The clothing shape came from the curve and I used the planar patch from curve to create the clothing. The vellum drape and vellum constraint helps to sew the clothing and make collisions with the character.
Some details were made through the process as well, like using the attribute wrangle, crease, and vellum post process to control the creases. Because creases are important to make the pieces of mesh look more realistic, I deleted some creases to make the clothing look more beautiful too.
Fish Animation Test
I made a procedural fish animation in Blender and used several nodes to control the rotation, speed, direction, and stretch of the fish. Then I exported it as an alembic file into Houdini and it worked. The procedural method gives a simpler way instead of keying each frame to animate the fish, and it looks very smooth. I will improve the animation to match the liquid ball movement later.
Animatics
Animatics Version 1
I made this simple animatic and edited the video based on the storyboards. I got some suggestions from my tutor about the camera angles and music. For example, the part when the character touches the tank and the liquid balls break the tank is a stunning and important thing in the story. We should improve the pace to slow the touching movement and emphasize this change in the plot. Additionally, some cut shots should be removed because they are too jumpy. We are going to find some music to improve the emotions. For instance, some sound effects can be added to symbolize different stages, like the touching movement or break-out movement. Therefore, the story can also be manipulated by the sound in some way, not just the visuals.
Animatics Version 2
Based on the feedback, we improved the animatics and going to complete our animation.
Motion Capture
After Rokoko’s first attempt didn’t work out well, we tried the Vicon system, which was more accurate, because the point of mocap is to capture more accurate movements to reduce the work of cleaning up afterward. The Rococo’s mobcap resources will distort the character’s body, and the skin weight looks odd after connecting the animation together.
I tried to transfer the FBX texture on Aleblic file and it didn’t work. For some reason, they have different point count although they are exactly identical characters. Therefore, I decided to choose only one type of character to make the later animation
We cleaned the animation in Maya exported as alembic files into Houdini, and matched it with our previous scene and simulations.
Rendering
I set the character materials in Houdini. We decided to use the FBX format for animation, and the alembic format for vellum cloth collision because the FBX character cannot simulate correctly with the cloth (might be affected by the bone deform node). The eyeball and the eyelashes textures were missing so I connected them manually. I found the cloth materials online and assigned it for the cloth, and changed some parameters like roughness, etc.
We found some references for the ambiance we wanted to create for the scene, and we liked the underwater muddy and glowing feelings. The liquid balls and tank looks more realistic if they are not that clean or transparent, because the underwater looks like water due to the misty and muddy look.
I did some render testing to see how we can make the underwater feelings. I made underwater sun rays to create light feelings under the surface of the water. Personally, I like putting the sun rays in the whole scene, because it looks more muddy and with clear line shape lights. Putting the sun rays inside the tank might make the scene looks empty, and we are still improving this.
I changed the tank material to the basic liquid in Houdini, which creates a better muddy and water effect. Additionally, I played with the lights and the shadows of the water balls made the ground look full of patterns too. I really like the crystal and blue effect of the water ball.
Because the cleaning of the character’s walking motion is not that perfect, the character sometimes steps her foot into the ground and I have to raise her up. So she looks slightly like walking in the air right now, and I will improve this later to make her look more sticks to the ground.
For example, the lighting of the ripples is very difficult. The ripples in real life reflect a lot of sunlight, but we wanted to create a dim environment, so we needed a lot of lighting and post-adjustment to make the whole film look consistent.
We added a pure ripple shot between touching the ripples and the water balls coming out. Because most of our shots have the character, we want to use this immersive shot to gradually reduce the cutting feelings of the camera.
We added the particle effect in consideration of how empty the tank would be if the water balls escaped from it. We wanted to make the box look more like water, in addition to muddy and blue materials, the planktonic effect can make it look more magical. Therefore, we wanted to use particles to resemble the planktonic. The final particle effect was created in Houdini by Sharon, who added a luminous effect to enrich the atmosphere.
To present a more focused effect on the character and the main water ball, I change the focal distance of the camera to adjust the depth of field. Therefore, the water balls look a bit blurry and just like the backgrounds to pop out the front part.
The improvement of this shot will be the changes of the bubbles, because the bubbles floating around the character cannot be seen clearly, and I will change the size to make it more obvious in later finalization.
The file formats that can be exported are limited, so we can’t perfectly use any format in Houdini, alembic format can do good collision animation but it doesn’t carry textures, and FBX carries materials but it has render issues in render farm.
Final Outcome
This is the final result, and we will try to re-render later to eliminate the glitch issues or replace our character with a new material that is appropriate for our story and scene. I want to improve the bubble animation as well because they look overlapping with the background water balls. In the editing stage, I adjusted the colour of each shot to make them more matching. I maintain the objects to be clear and change the whole tone slightly purple and cold to create a cool-toned style. What is more, the fonts also had luminous effects, which were more related to our overall atmosphere.